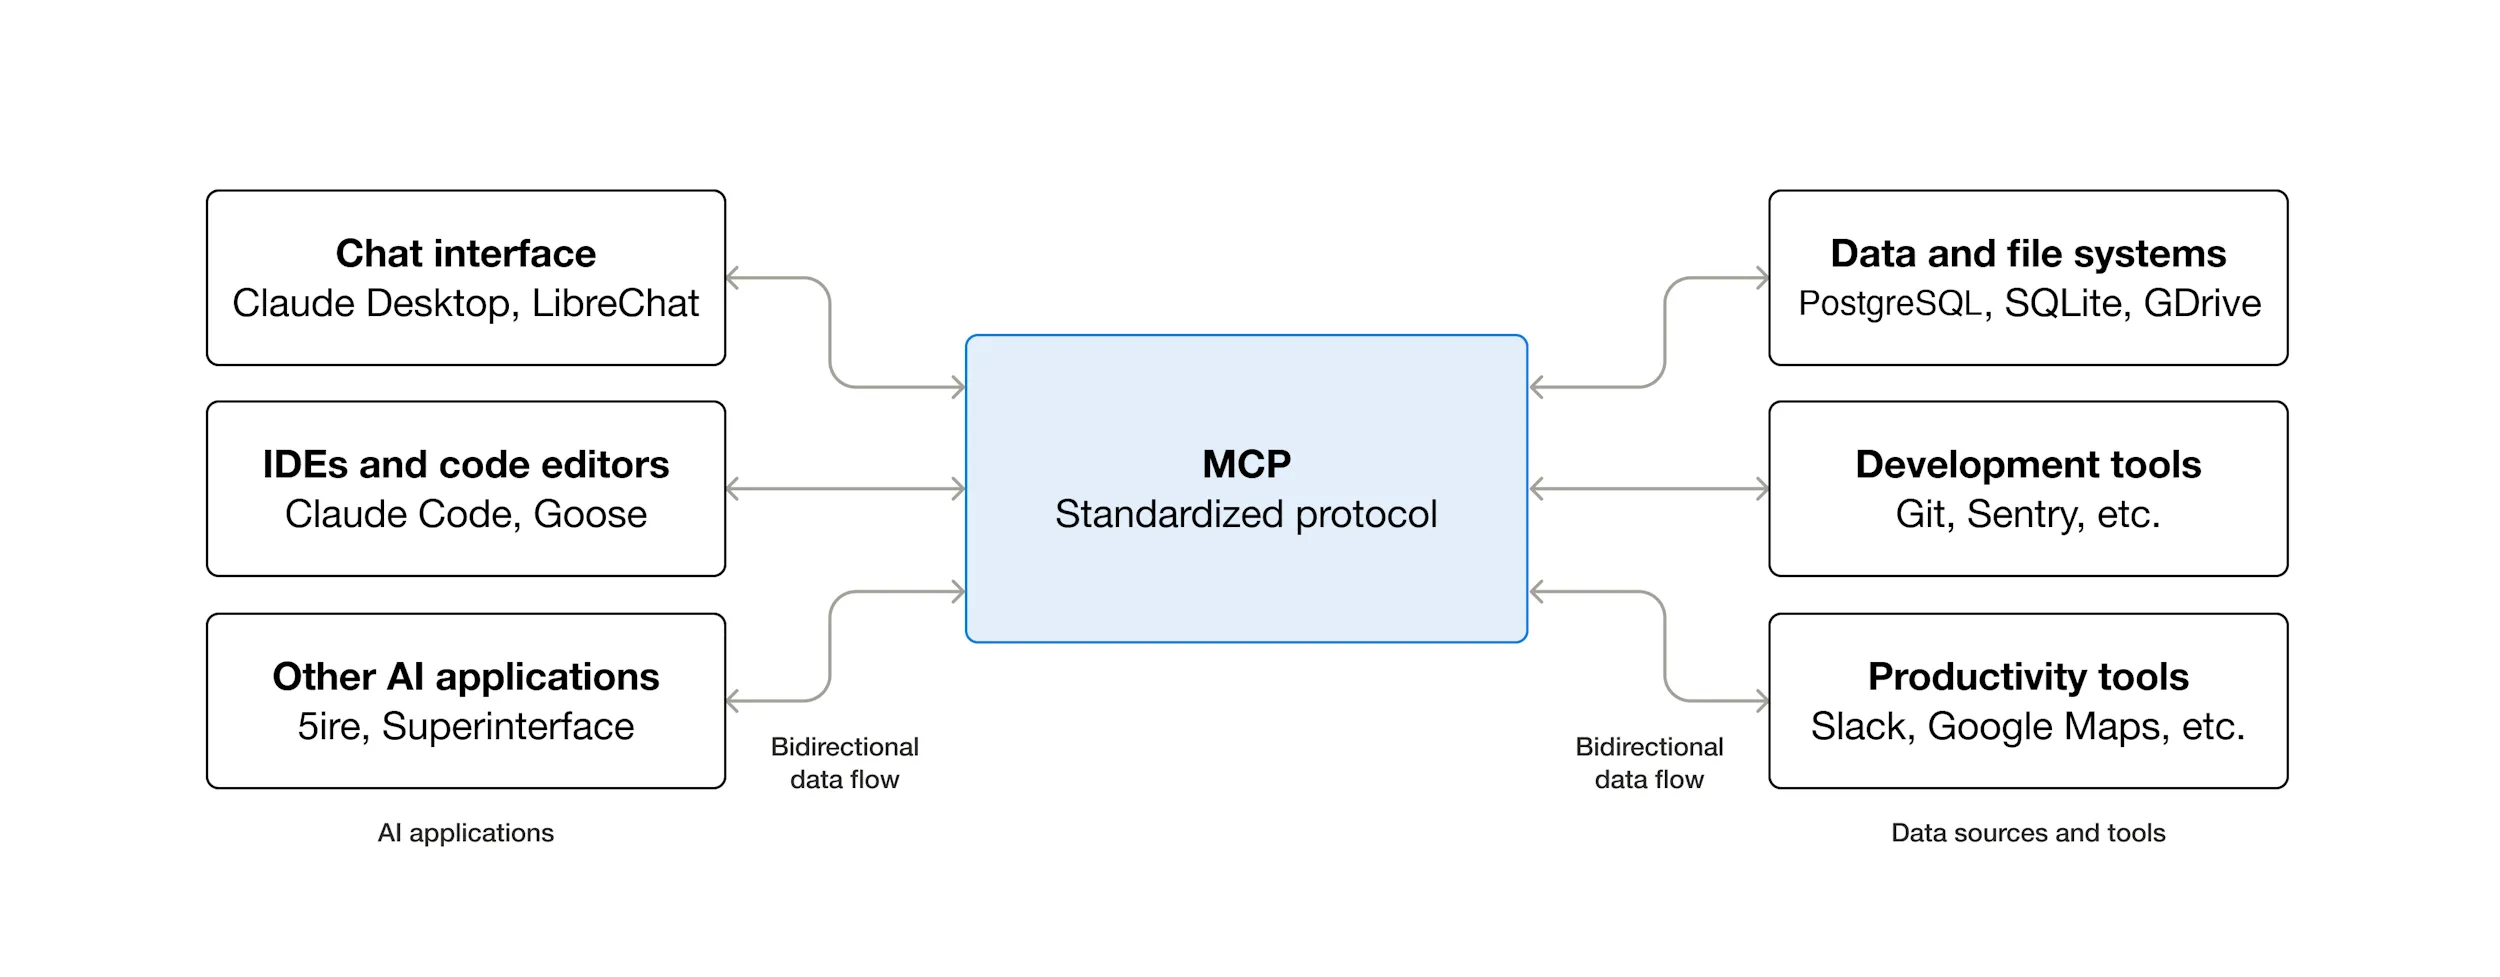
MCP (Model Context Protocol) is an open-source standard for connecting AI applications to external systems.
On this page
Introduction
Using MCP, AI applications can connect to data sources (e.g., local files, databases), tools (e.g., search engines, calculators) and workflows (e.g., specialized prompts) — enabling them to access key information and perform tasks.
The November 25th spec release introduced many new features, including asynchronous operations, statelessness, server identity, and official extensions.
There are also official SDKs (Software Development Kits) for MCP in all major programming languages with 97M+ monthly SDK downloads across Python and TypeScript.
Depending on where you sit in the ecosystem, MCP can have a range of benefits.
-
Developers: MCP reduces development time and complexity when building, or integrating with, an AI application or agent.
-
AI applications or agents: MCP provides access to an ecosystem of data sources, tools, and apps which will enhance capabilities and improve the end-user experience.
-
End-users: MCP results in more capable AI applications or agents which can access your data and take actions on your behalf when necessary.
When you use an MCP server, it adds to the context. This can quickly add up if you have a lot of tools. So we recommend being careful with which MCP servers you use.
Certain MCP servers, like the GitHub MCP server, tend to add a lot of tokens and can easily exceed the context limit.
Install
Create a new project with Typescript - Bun (select Blank template) and open it with OpenCode:
bun init opencode-mcpopencode opencode-mcpOpenCode uses a opencode.jsonc configuration file to manage MCP servers.
You can install MCP servers at the global level (for all projects) or at the project level.
Configuration File
To configure MCP servers globally, create or edit the file ~/.config/opencode/opencode.jsonc:
{ "$schema": "https://opencode.ai/config.json", "mcp": { // Local MCP server: runs a command on your machine "sqlite": { "type": "local", "command": ["uvx", "mcp-server-sqlite", "--db-path", "~/my-database.sqlite"], "enabled": true }, // Remote MCP server: connects to a URL "context7": { "type": "remote", "url": "https://mcp.context7.com/mcp", "enabled": true } }}Each MCP server needs:
- A unique name (e.g.,
"sqlite","context7") - A type:
"local"(runs a command) or"remote"(connects to a URL) - For local servers: a command array with the executable and arguments
- Optionally: environment variables, headers, or enabled flag
In this example we configured two MCP servers:
-
sqlite is a local server. It runs
mcp-server-sqliteon your machine, allowing OpenCode to query, insert, and modify data in a SQLite database using natural language. You can ask things like “show all students with a grade above 80” and OpenCode will translate that into SQL and execute it. -
context7 is a remote server. It connects to an external service that searches through library and framework documentation. When you are unsure how to use an API, you can add
use context7to your prompt and OpenCode will look up the relevant docs for you.
These two servers illustrate the two types of MCP integration: local servers run a process on your machine (useful for accessing local resources like databases or files), while remote servers connect to an external URL (useful for cloud services that require no local setup).
Project-Level Configuration
For project-specific servers, create opencode.jsonc in your project root:
{ "$schema": "https://opencode.ai/config.json", "mcp": { "sqlite": { "type": "local", "command": ["uvx", "mcp-server-sqlite", "--db-path", "db.sqlite"], "enabled": true } }}Project-level configuration overrides global configuration.
This is useful for servers that are only relevant to a specific project (e.g., a database server).
OpenCode uses JSONC (JSON with Comments) instead of plain JSON.
JSONC has several advantages:
- Context: You can comment out specific models or providers when testing (e.g.,
// "model": "gpt-4o"). - Documentation: You can leave notes for yourself or your team (e.g.,
// Use this for student-facing projects only).
Registry
MCP has an official, community-driven Registry for discovering available MCP servers.
- MCP Bench – Explore the MCP registry with richer filters, community stars, and LLM-generated classification tags.
- MCP Registry Database – A minimal, web browsable, live database of the official MCP Registry source code.
- TeamSpark AI Server Registry – Browse and discover servers from the official MCP Registry (source code).
- MCP Registry UI – A fully client‑side app to search, filter, configure, and install servers from MCP Registry APIs (source code).
Filesystem Server
Access and manage files in specified directories.
[mcp.servers.filesystem]command = "npx"args = ["-y", "@modelcontextprotocol/server-filesystem", "/Users/me/projects"]Exercises
uv init skillsopencode skills/initSQLite — Query a Local Database with Natural Language
In this exercise you will connect OpenCode to a local SQLite database and explore and manipulate data using plain English.
Tell OpenCode to use the SQLite MCP server:
Add the SQLite MCP server to project configurationopencode will create a new file ~/.config/opencode/opencode.jsonc
{ "$schema": "https://opencode.ai/config.json", "mcp": { "sqlite": { "type": "local", "command": ["uvx", "mcp-server-sqlite", "--db-path", "db.sqlite"], "enabled": true } }}and will respond with a message like this:
Created
opencode.jsonwith the SQLite MCP server configured. It uses uvx (consistent with the project’s uv-based toolchain) to runmcp-server-sqlite, pointing atdb.sqlitein the project root. The--db-pathvalue can be changed to any path you prefer. To use it in a prompt, reference it by name, e.g.: use the sqlite tool to show all tables in the database
Tell OpenCode: “create a db.sqlite database”
And refine wiht: “create a student table with some sample data”
TODO
- Create a small demo database to work with:
sqlite3 ~/demo.db "CREATE TABLE students (id INTEGER PRIMARY KEY, name TEXT, grade INTEGER); INSERT INTO students VALUES (1, 'Alice', 90), (2, 'Bob', 75), (3, 'Carol', 88);"ask it to describe the database:
use sqlite to describe the schema of the database- Ask it to query the data in plain English:
use sqlite to find all students with a grade above 80- Ask it to add a new record:
use sqlite to add a student named "David" with a grade of 95Then confirm the insert:
use sqlite to show all students sorted by grade descending- Try a more open-ended question:
use sqlite to find the average grade and tell me which students are above averageReflection
- How accurately did OpenCode translate your natural language requests into SQL?
- Did it make any mistakes? How did you catch them?
- What are the risks of letting an AI write and execute database queries directly?
GitLab — Triage and Fix an Issue with OpenCode
In this exercise you will connect OpenCode to a real GitLab project through CI/CD and let it explain and fix an issue automatically.
Prerequisites
- A GitLab account with at least one project
- An OpenCode auth JSON (generated after running
/connectin the TUI)
Steps
-
In your GitLab project, go to Settings > CI/CD > Variables and add a new File type variable named
OPENCODE_AUTH_JSON. Paste the contents of~/.local/share/opencode/auth.jsonas the value. Mark it as Masked and hidden. -
Create or edit
.gitlab-ci.ymlat the root of your project and include the community component:
include: - component: $CI_SERVER_FQDN/nagyv/gitlab-opencode/opencode@2 inputs: config_dir: ${CI_PROJECT_DIR}/opencode-config auth_json: $OPENCODE_AUTH_JSON message: "Explain the project structure and suggest improvements."-
Push the change and watch the pipeline run. Check the job log to see OpenCode’s output.
-
Create a new issue in your GitLab project describing a small bug or missing feature. Then add a comment:
@opencode explain this issue- After OpenCode replies, add another comment:
@opencode fix this- OpenCode will create a new branch and open a merge request. Review the MR: Does the proposed change make sense? What would you change?
Reflection
- What surprised you about how OpenCode interpreted the issue?
- Would you merge the MR as-is, or would you edit it first? Why?
Cloudflare — Deploy and Connect a Remote MCP Server
In this exercise you will create your own remote MCP server running on Cloudflare Workers and connect OpenCode to it.
Prerequisites
- A Cloudflare account (free tier is fine)
- Node.js and npm installed
Steps
- Scaffold a new MCP server project using the Cloudflare template:
npm create cloudflare@latest -- my-mcp-server --template=cloudflare/ai/demos/remote-mcp-authlesscd my-mcp-server- Start the development server locally:
npm startNote the port in the output (usually 8788). The MCP endpoint is at http://localhost:8788/mcp.
- In a separate terminal, run the MCP inspector to explore your server:
npx @modelcontextprotocol/inspector@latestOpen the inspector in your browser, enter http://localhost:8788/mcp, click Connect, then List Tools. You should see the tools exposed by the example server.
- Add your local server to OpenCode’s configuration. Create or edit
~/.config/opencode/opencode.jsonc:
{ "$schema": "https://opencode.ai/config.json", "mcp": { "my-mcp": { "type": "remote", "url": "http://localhost:8788/mcp", "enabled": true } }}- Start OpenCode and ask it to use one of your MCP tools:
use the my-mcp tool to list available tools- Once it works locally, deploy to Cloudflare Workers:
npx wrangler@latest deployThe server will be live at https://my-mcp-server.<your-account>.workers.dev/mcp. Update your OpenCode config to point to the remote URL.
Reflection
- What tools does the example server expose? What would you add for your own projects?
- How does a remote MCP server differ from a local one in terms of latency and availability?
Web Development
Integrating the Model Context Protocol (MCP) into OpenCode allows you to connect your AI coding agent to external web development tools (like Chrome DevTools, Playwright, or local filesystems) without bloating the context window.
Which should you use?
- Chrome DevTools: Best for working together with the agent on a specific site or app you are currently viewing or developing.
- Playwright: Best for background tasks, such as web scraping, multi-site analysis, or cross-browser verification.
Playwright
Playwright is a powerful automation framework that supports Chromium, Firefox, and WebKit. When used as an MCP server, it acts as a “background worker” that the agent can control independently of your main browser.
Add the Playwright MCP server to project configuration- How it works: The MCP server launches a browser instance (usually headless) specifically for the agent.
- Strengths:
- Autonomy: The agent doesn’t need your browser to be open. It can perform tasks “in the dark.”
- Speed & Scale: Can be faster for scraping or batch processing as it doesn’t render a full UI to your screen.
- Consistency: Every session starts fresh, avoiding issues with cookies or cache from your personal browsing.
- Cross-browser: Can test or automate across different engines (Firefox, Safari/WebKit).
- Weaknesses:
- Visibility: You typically can’t “see” what it’s doing unless you explicitly tell it to take screenshots.
- Authentication: Since it starts fresh, it isn’t logged into your accounts by default.
Chrome DevTools
This server uses the Chrome DevTools Protocol (CDP) to bridge an LLM to a browser instance you are currently using.
Add the chrome-devtools-mcp server to project configuration- How it works: You launch Chrome with a specific flag (
--remote-debugging-port=9222). The MCP server then “attaches” to that port. - Strengths:
- Visibility: You can watch the agent move the mouse, click buttons, or navigate in real-time.
- Context: It can access tabs you already have open, including those where you are already logged into services.
- Debugging: Excellent for inspecting the DOM or CSS of a site you are currently building.
- Weaknesses:
- Requires manual browser launch with debugging enabled.
- If you close the browser or the tab, the agent loses access.
Chrome Devtools uses npx -y chrome-devtools-mcp to run the server locally. To use it, launch Chrome with remote debugging enabled:
On macOS:
/Applications/Google\ Chrome.app/Contents/MacOS/Google\ Chrome --remote-debugging-port=9222On Linux:
google-chrome --remote-debugging-port=9222On Windows:
"C:\Program Files\Google\Chrome\Application\chrome.exe" --remote-debugging-port=9222Close all Chrome windows before running the command. If Chrome is already running, the --remote-debugging-port flag will be ignored.